
2 years in the past, I wrote A Information to Docker and ROS, which is one among my most steadily seen posts — seemingly as a result of it’s a tough subject and other people have been looking for solutions. Since then, I’ve had the possibility to make use of Docker extra in my work and have picked up some new tips. This was lengthy overdue, however I’ve lastly collected my up to date learnings on this put up.
Not too long ago, I encountered an article titled ROS Docker; 6 the explanation why they don’t seem to be a great match, and I largely agree with it. Nevertheless, the fact is that it’s nonetheless fairly troublesome to make sure a reproducible ROS surroundings for individuals who haven’t spent years combating the ROS studying curve and are adept at debugging dependency and/or construct errors… so Docker continues to be very a lot a crutch that we fall again on to get working demos (and typically merchandise!) out the door.
If the article above hasn’t fully discouraged you from embarking on this Docker journey, please take pleasure in studying.
Revisiting Our Dockerfile with ROS 2
Now that ROS 1 is on its last model and approaching finish of life in 2025, I believed it might be acceptable to rehash the TurtleBot3 instance repo from the earlier put up utilizing ROS 2.
A lot of the massive adjustments on this improve need to do with ROS 2, together with shopper libraries, launch recordsdata, and configuring DDS. The examples themselves have been up to date to make use of the most recent instruments for conduct timber: BehaviorTree.CPP 4 / Groot 2 for C++ and py_trees / py_trees_ros_viewer for Python. For extra data on the instance and/or conduct timber, consult with my Introduction to Habits Bushes put up.
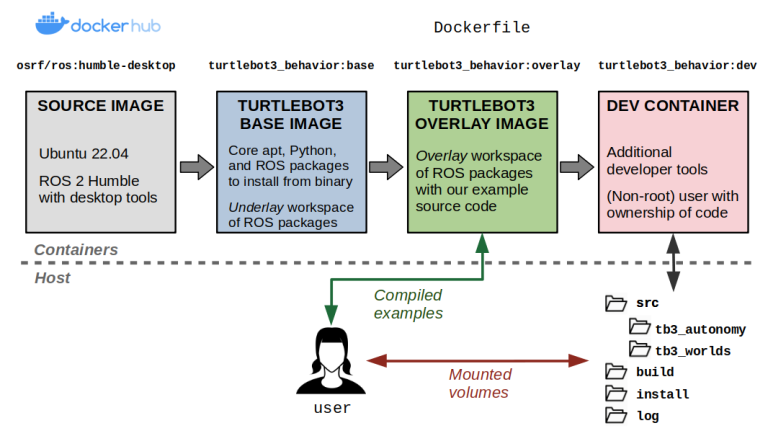
From a Docker standpoint, there aren’t too many variations. Our container structure will now be as follows:
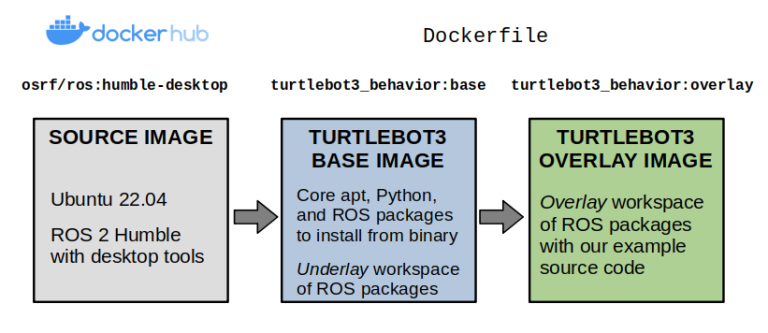
Layers of our TurtleBot3 instance Docker picture.
We’ll begin by making our Dockerfile, which defines the contents of our picture. Our preliminary base layer inherits from one of many public ROS photos, osrf/ros:humble-desktop, and units up the dependencies from our instance repository into an underlay workspace. These are outlined utilizing a vcstool repos file.
Discover that we’ve arrange the argument, ARG ROS_DISTRO=humble, so it may be modified for different distributions of ROS 2 (Iron, Rolling, and so on.). Moderately than creating a number of Dockerfiles for various configurations, you must strive utilizing construct arguments like these as a lot as attainable with out being “overly intelligent” in a method that impacts readability.
ARG ROS_DISTRO=humble
########################################
# Base Picture for TurtleBot3 Simulation #
########################################
FROM osrf/ros:${ROS_DISTRO}-desktop as base
ENV ROS_DISTRO=${ROS_DISTRO}
SHELL [“/bin/bash”, “-c”]
# Create Colcon workspace with exterior dependencies
RUN mkdir -p /turtlebot3_ws/src
WORKDIR /turtlebot3_ws/src
COPY dependencies.repos .
RUN vcs import
To construct your picture with a selected argument — let’s say you wish to use ROS 2 Rolling as a substitute — you can do the next… offered that every one your references to ${ROS_DISTRO} even have one thing that accurately resolves to the rolling distribution.
docker construct -f docker/Dockerfile
--build-arg="ROS_DISTRO=rolling"
--target base -t turtlebot3_behavior:base .
I personally have had many points in ROS 2 Humble and later with the default DDS vendor (FastDDS), so I like to change my default implementation to Cyclone DDS by putting in it and setting an surroundings variable to make sure it’s at all times used.
# Use Cyclone DDS as middleware
RUN apt-get replace && apt-get set up -y --no-install-recommends
ros-${ROS_DISTRO}-rmw-cyclonedds-cpp
ENV RMW_IMPLEMENTATION=rmw_cyclonedds_cpp
Now, we’ll create our overlay layer. Right here, we’ll copy over the instance supply code, set up any lacking dependencies with rosdep set up, and arrange an entrypoint to run each time a container is launched.
###########################################
# Overlay Picture for TurtleBot3 Simulation #
###########################################
FROM base AS overlay
# Create an overlay Colcon workspace
RUN mkdir -p /overlay_ws/src
WORKDIR /overlay_ws
COPY ./tb3_autonomy/ ./src/tb3_autonomy/
COPY ./tb3_worlds/ ./src/tb3_worlds/
RUN supply /turtlebot3_ws/set up/setup.bash
&& rosdep set up –from-paths src –ignore-src –rosdistro ${ROS_DISTRO} -y
&& colcon construct –symlink-install
# Arrange the entrypoint
COPY ./docker/entrypoint.sh /
ENTRYPOINT [ “/entrypoint.sh” ]
The entrypoint outlined above is a Bash script that sources ROS 2 and any workspaces which can be constructed, and units up surroundings variables essential to run our TurtleBot3 examples. You should use entrypoints to do another varieties of setup you may discover helpful on your utility.
#!/bin/bash
# Fundamental entrypoint for ROS / Colcon Docker containers
# Supply ROS 2
supply /decide/ros/${ROS_DISTRO}/setup.bash
# Supply the bottom workspace, if constructed
if [ -f /turtlebot3_ws/install/setup.bash ]
then
supply /turtlebot3_ws/set up/setup.bash
export TURTLEBOT3_MODEL=waffle_pi
export GAZEBO_MODEL_PATH=$GAZEBO_MODEL_PATH:$(ros2 pkg prefix turtlebot3_gazebo)/share/turtlebot3_gazebo/fashions
fi
# Supply the overlay workspace, if constructed
if [ -f /overlay_ws/install/setup.bash ]
then
supply /overlay_ws/set up/setup.bash
export GAZEBO_MODEL_PATH=$GAZEBO_MODEL_PATH:$(ros2 pkg prefix tb3_worlds)/share/tb3_worlds/fashions
fi
# Execute the command handed into this entrypoint
exec “$@”
At this level, you must be capable of construct the total Dockerfile:
docker construct
-f docker/Dockerfile --target overlay
-t turtlebot3_behavior:overlay  .
Then, we are able to begin one among our instance launch recordsdata with the proper settings with this mouthful of a command. Most of those surroundings variables and volumes are wanted to have graphics and ROS 2 networking functioning correctly from inside our container.
docker run -it --net=host --ipc=host --privileged
--env="DISPLAY"
--env="QT_X11_NO_MITSHM=1"
--volume="/tmp/.X11-unix:/tmp/.X11-unix:rw"
--volume="${XAUTHORITY}:/root/.Xauthority"
turtlebot3_behavior:overlay
bash -c "ros2 launch tb3_worlds tb3_demo_world.launch.py"
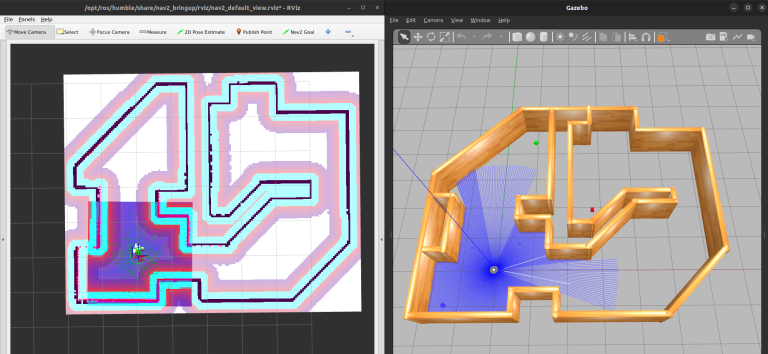
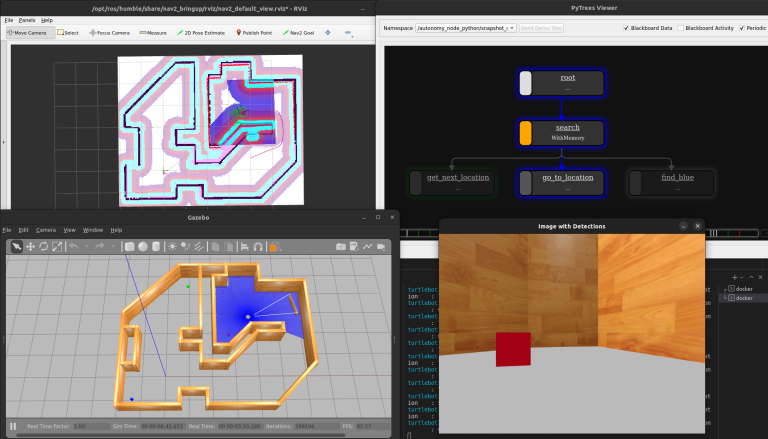
Our TurtleBot3 instance simulation with RViz (left) and Gazebo traditional (proper).
Introducing Docker Compose
From the previous couple of snippets, we are able to see how the docker construct and docker run instructions can get actually lengthy and unwieldy as we add extra choices. You possibly can wrap this in a number of abstractions, together with scripting languages and Makefiles… however Docker has already solved this downside via Docker Compose.
Briefly, Docker Compose lets you create a YAML file that captures all of the configuration wanted to arrange constructing photos and operating containers.
Docker Compose additionally differentiates itself from the “plain” Docker command in its capability to orchestrate companies. This includes constructing a number of photos or targets throughout the identical picture(s) and launching a number of packages on the identical time that comprise a complete utility. It additionally permits you to lengthen present companies to reduce copy-pasting of the identical settings in a number of locations, outline variables, and extra.
The tip objective is that we have now quick instructions to handle our examples:
- docker compose construct will construct what we’d like
- docker compose up
will launch what we’d like
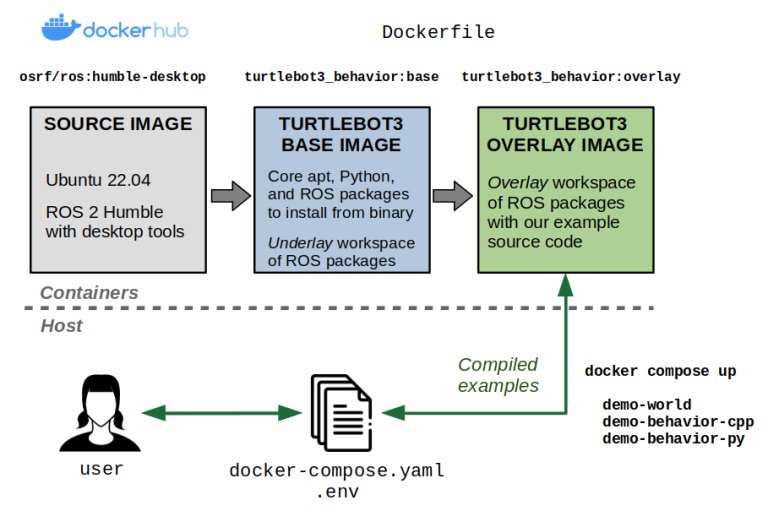
Docker Compose permits us to extra simply construct and run our containerized examples.
The default identify of this magical YAML file is docker-compose.yaml. For our instance, the docker-compose.yaml file appears as follows:
model: "3.9"
companies:
# Base picture containing dependencies.
base:
picture: turtlebot3_behavior:base
construct:
context: .
dockerfile: docker/Dockerfile
args:
ROS_DISTRO: humble
goal: base
# Interactive shell
stdin_open: true
tty: true
# Networking and IPC for ROS 2
network_mode: host
ipc: host
# Wanted to show graphical functions
privileged: true
surroundings:
# Wanted to outline a TurtleBot3 mannequin sort
- TURTLEBOT3_MODEL=${TURTLEBOT3_MODEL:-waffle_pi}
# Permits graphical packages within the container.
- DISPLAY=${DISPLAY}
- QT_X11_NO_MITSHM=1
- NVIDIA_DRIVER_CAPABILITIES=all
volumes:
# Permits graphical packages within the container.
- /tmp/.X11-unix:/tmp/.X11-unix:rw
- ${XAUTHORITY:-$HOME/.Xauthority}:/root/.Xauthority
# Overlay picture containing the instance supply code.
overlay:
extends: base
picture: turtlebot3_behavior:overlay
construct:
context: .
dockerfile: docker/Dockerfile
goal: overlay
# Demo world
demo-world:
extends: overlay
command: ros2 launch tb3_worlds tb3_demo_world.launch.py
# Habits demo utilizing Python and py_trees
demo-behavior-py:
extends: overlay
command: >
ros2 launch tb3_autonomy tb3_demo_behavior_py.launch.py
tree_type:=${BT_TYPE:?}
enable_vision:=${ENABLE_VISION:?}
target_color:=${TARGET_COLOR:?}
# Habits demo utilizing C++ and BehaviorTree.CPP
demo-behavior-cpp:
extends: overlay
command: >
ros2 launch tb3_autonomy tb3_demo_behavior_cpp.launch.py
tree_type:=${BT_TYPE:?}
enable_vision:=${ENABLE_VISION:?}
target_color:=${TARGET_COLOR:?}
As you may see from the Docker Compose file above, you may specify variables utilizing the acquainted $ operator in Unix based mostly programs. These variables will by default be learn from both your host surroundings or via an surroundings file (normally referred to as .env). Our instance.env file appears like this:
# TurtleBot3 mannequin
TURTLEBOT3_MODEL=waffle_pi
# Habits tree sort: Will be naive or queue.
BT_TYPE=queue
# Set to true to make use of imaginative and prescient, else false to solely do navigation behaviors.
ENABLE_VISION=true
# Goal coloration for imaginative and prescient: Will be purple, inexperienced, or blue.
TARGET_COLOR=blue
At this level, you may construct all the pieces:
# By default, picks up a `docker-compose.yaml` and `.env` file.
docker compose construct
# You can even explicitly specify the recordsdata
docker compose –file docker-compose.yaml –env-file .env construct
Then, you may run the companies you care about:
# Carry up the simulation
docker compose up demo-world
# After the simulation has began,
# launch one among these in a separate Terminal
docker compose up demo-behavior-py
docker compose up demo-behavior-cpp
The complete TurtleBot3 demo operating with py_trees because the Habits Tree.
Establishing Developer Containers
Our instance thus far works nice if we wish to package deal up working examples to different customers. Nevertheless, if you wish to develop the instance code inside this surroundings, you have to to beat the next obstacles:
- Each time you modify your code, you have to to rebuild the Docker picture. This makes it extraordinarily inefficient to get suggestions on whether or not your adjustments are working as supposed. That is already an on the spot deal-breaker.
- You possibly can clear up the above through the use of bind mounts to sync up the code in your host machine with that within the container. This will get us heading in the right direction, however you’ll discover that any recordsdata generated contained in the container and mounted on the host shall be owned by
rootas default. You will get round this by whipping out thesudoandchownhammer, but it surely’s not obligatory. - All of the instruments it’s possible you’ll use for growth, together with debuggers, are seemingly lacking contained in the container… except you put in them within the Dockerfile, which may bloat the scale of your distribution picture.
Fortunately, there’s a idea of a developer container (or dev container). To place it merely, this can be a separate container that allows you to truly do your growth in the identical Docker surroundings you’ll use to deploy your utility.
There are various methods of implementing dev containers. For our instance, we’ll modify the Dockerfile so as to add a brand new dev goal that extends our present overlay goal.
Dev containers permit us to develop inside a container from our host system with minimal overhead.
This dev container will do the next:
- Set up further packages that we could discover useful for growth, similar to debuggers, textual content editors, and graphical developer instruments. Critically, these is not going to be a part of the
overlaylayer that we’ll ship to finish customers. - Create a brand new person that has the identical person and group identifiers because the person that constructed the container on the host. It will make it such that every one recordsdata generated throughout the container (in folders we care about) have the identical possession settings as if we had created the file on our host. By “folders we care about”, we’re referring to the ROS workspace that accommodates the supply code.
- Put our entrypoint script within the person’s Bash profile (
~/.bashrcfile). This lets us supply our ROS surroundings not simply at container startup, however each time we connect a brand new interactive shell whereas our dev container stays up.
#####################
# Growth Picture #
#####################
FROM overlay as dev
# Dev container arguments
ARG USERNAME=devuser
ARG UID=1000
ARG GID=${UID}
# Set up additional instruments for growth
RUN apt-get replace && apt-get set up -y –no-install-recommends
gdb gdbserver nano
# Create new person and residential listing
RUN groupadd –gid $GID $USERNAME
&& useradd –uid ${GID} –gid ${UID} –create-home ${USERNAME}
&& echo ${USERNAME} ALL=(root) NOPASSWD:ALL > /and so on/sudoers.d/${USERNAME}
&& chmod 0440 /and so on/sudoers.d/${USERNAME}
&& mkdir -p /residence/${USERNAME}
&& chown -R ${UID}:${GID} /residence/${USERNAME}
# Set the possession of the overlay workspace to the brand new person
RUN chown -R ${UID}:${GID} /overlay_ws/
# Set the person and supply entrypoint within the person’s .bashrc file
USER ${USERNAME}
RUN echo “supply /entrypoint.sh” >> /residence/${USERNAME}/.bashrc
You possibly can then add a brand new dev service to the docker-compose.yaml file. Discover that we’re including the supply code as volumes to mount, however we’re additionally mapping the folders generated by colcon construct to a .colcon folder on our host file system. This makes it such that generated construct artifacts persist between stopping our dev container and bringing it again up, in any other case we’d need to do a clear rebuild each time.
dev:
extends: overlay
picture: turtlebot3_behavior:dev
construct:
context: .
dockerfile: docker/Dockerfile
goal: dev
args:
- UID=${UID:-1000}
- GID=${UID:-1000}
- USERNAME=${USERNAME:-devuser}
volumes:
# Mount the supply code
- ./tb3_autonomy:/overlay_ws/src/tb3_autonomy:rw
- ./tb3_worlds:/overlay_ws/src/tb3_worlds:rw
# Mount colcon construct artifacts for quicker rebuilds
- ./.colcon/construct/:/overlay_ws/construct/:rw
- ./.colcon/set up/:/overlay_ws/set up/:rw
- ./.colcon/log/:/overlay_ws/log/:rw
person: ${USERNAME:-devuser}
command: sleep infinity
At this level you are able to do:
# Begin the dev container
docker compose up dev
# Connect an interactive shell in a separate Terminal
# NOTE: You are able to do this a number of occasions!
docker compose exec -it dev bash
As a result of we have now mounted the supply code, you may make modifications in your host and rebuild contained in the dev container… or you need to use useful instruments just like the Visible Studio Code Containers extension to immediately develop contained in the container. As much as you.
For instance, when you’re contained in the container you may construct the workspace with:
colcon construct
Because of our quantity mounts, you’ll see that the contents of the .colcon/construct, .colcon/set up, and .colcon/log folders in your host have been populated. Which means when you shut down the dev container and convey up a brand new occasion, these recordsdata will live on and can pace up rebuilds utilizing colcon construct.
Additionally, as a result of we have now gone via the difficulty of creating a person, you’ll see that these recordsdata will not be owned by root, so you may delete them when you’d like to scrub out the construct artifacts. You must do that with out making the brand new person and also you’ll run into some annoying permissions roadblocks.
$ ls -al .colcon
whole 20
drwxrwxr-x  5 sebastian sebastian 4096 Jul  9 10:15 .
drwxrwxr-x 10 sebastian sebastian 4096 Jul  9 10:15 ..
drwxrwxr-x  4 sebastian sebastian 4096 Jul  9 11:29 construct
drwxrwxr-x  4 sebastian sebastian 4096 Jul  9 11:29 set up
drwxrwxr-x  5 sebastian sebastian 4096 Jul  9 11:31 log
The idea of dev containers is so widespread at this level that an ordinary has emerged at containers.dev. I additionally wish to level out another nice sources together with Allison Thackston’s weblog, Griswald Brooks’ GitHub repo, and the official VSCode dev containers tutorial.
Conclusion
On this put up, you will have seen how Docker and Docker Compose may also help you create reproducible ROS 2 environments. This contains the power to configure variables at construct and run time, in addition to creating dev containers that can assist you develop your code in these environments earlier than distributing it to others.
We’ve solely scratched the floor on this put up, so be sure you poke round on the sources linked all through, check out the instance repository, and customarily keep interested in what else you are able to do with Docker to make your life (and your customers’ lives) simpler.
As at all times, please be happy to succeed in out with questions and suggestions. Docker is a extremely configurable software, so I’m genuinely interested in how this works for you or whether or not you will have approached issues in a different way in your work. I would study one thing new!

Sebastian Castro
is a Senior Robotics Engineer at PickNik.


